This installation page is grouped under “Software” Though it covers the upgrade process of the firmware too.
Installation on Linux (Ubuntu)
- Download this script
- make it executable:
- chmod +x ubuntu-usbpicprog-install-script.sh
- execute the script
- From now on you will receive automatic updates for usbpicprog. (Currently only Ubuntu 9.10, 10.04, and 10.10
- Restart your system to give yourself access to the usbpicprog hardware as a general user in the plugdev group.
- Instructions on how to upgrade the firmware can be found below
Installation on Linux (All versions)
- Install the following packages:
- wxWidgets 2.9.0 or later
- libusb 1.0
- All common development files like gcc, libglib2, libtool, intltool and all your other build friends
- Download the usbpicprog-src archive and uncompress it into your home directory
- pop up a terminal and cd to the newly made directory. now run the following commands:
- ./configure
- make
- su
- ***now type your password when asked, if it doesn’t work try sudo -s***
- make install
- Make sure you are a member of the plugdev group
- Restart your system to give yourself access to the usbpicprog hardware as a general user in the plugdev group.
- Instructions on how to upgrade the firmware can be found below
Installation on Windows (XP, Vista, 7) Windows 8 users should read this page first
- Download and install the Windows installer (32 or 64 bit according to your system), containing the usbpicprog driver, libusb and the usbpicprog installer.
- Run the usbpicprog windows installer
- Plug in your usbpicprog programmer, if it doesn’t work right away, or if you are getting a message like “could not load libusb”, launch the device manager, find the usbpicprog programmer and choose “re-install driver”. Now point to the driver which is located in “c:\program files\usbpicprog\driver”
- Instructions on how to upgrade the firmware can be found below
Installation on Macosx
- Download and install the usbpicprog-macosx binary package
- Instructions on how to upgrade the firmware can be found below
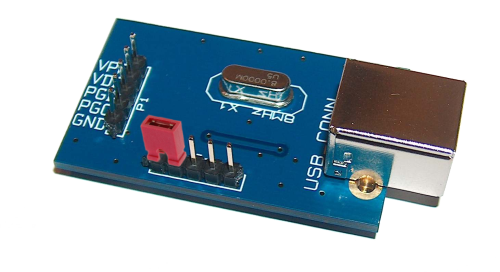
- Put one jumper on the usbpicprog programmer, in order to start the hardware in bootloader mode (as shown in the image below)
- Plug in usbpicprog
- Launch the usbpicprog application, download the latest usbpicprog firmware and open the .hex file for the firmware upgrade, now choose Actions –> Program to write the firmware into the usbpicprog hardware.
(make sure that the option “erase before programming” is on in Options –> Preferences) - Unplug usbpicprog, put the second jumper as shown on the image below and plug it in again. Usbpicprog is now ready to use
